Twenty-one days. That is what stands between a clutch of fertile eggs and a brood of fluffy chicks - and when a broody hen is running the operation, she handles temperature, humidity, and turning without a single dial to turn. For keepers who have a reliably broody hen and a rooster (or access to fertile eggs from elsewhere), letting her do the job is often easier than an incubator and almost always better for the chicks.
Getting it right means more than sliding eggs under her and waiting. The decisions you make in the first hour - how many eggs, whether to move her, how to swap in fresh fertile eggs without losing your place on the calendar - shape whether that 75 to 80 percent natural hatch rate holds up or slides into disappointment. (FAO's small-flock poultry guidance cites 80 percent as normal for a well-managed broody and 75 to 80 percent as satisfactory.)
How do you choose the right hen and confirm she is genuinely broody?
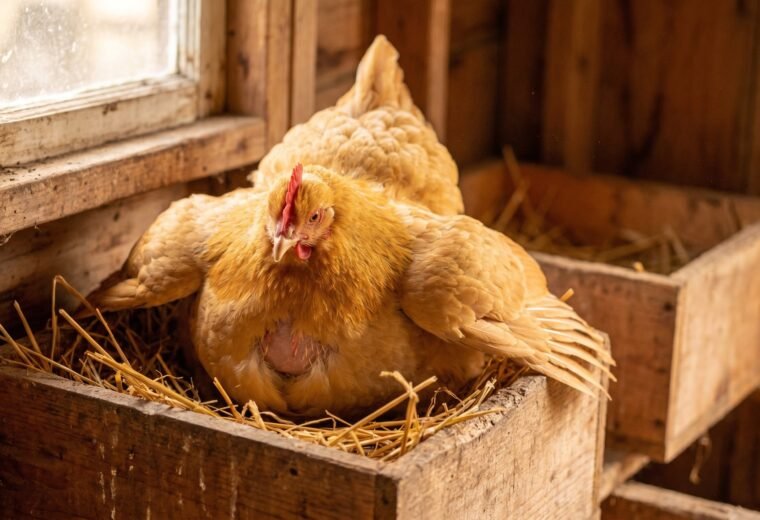
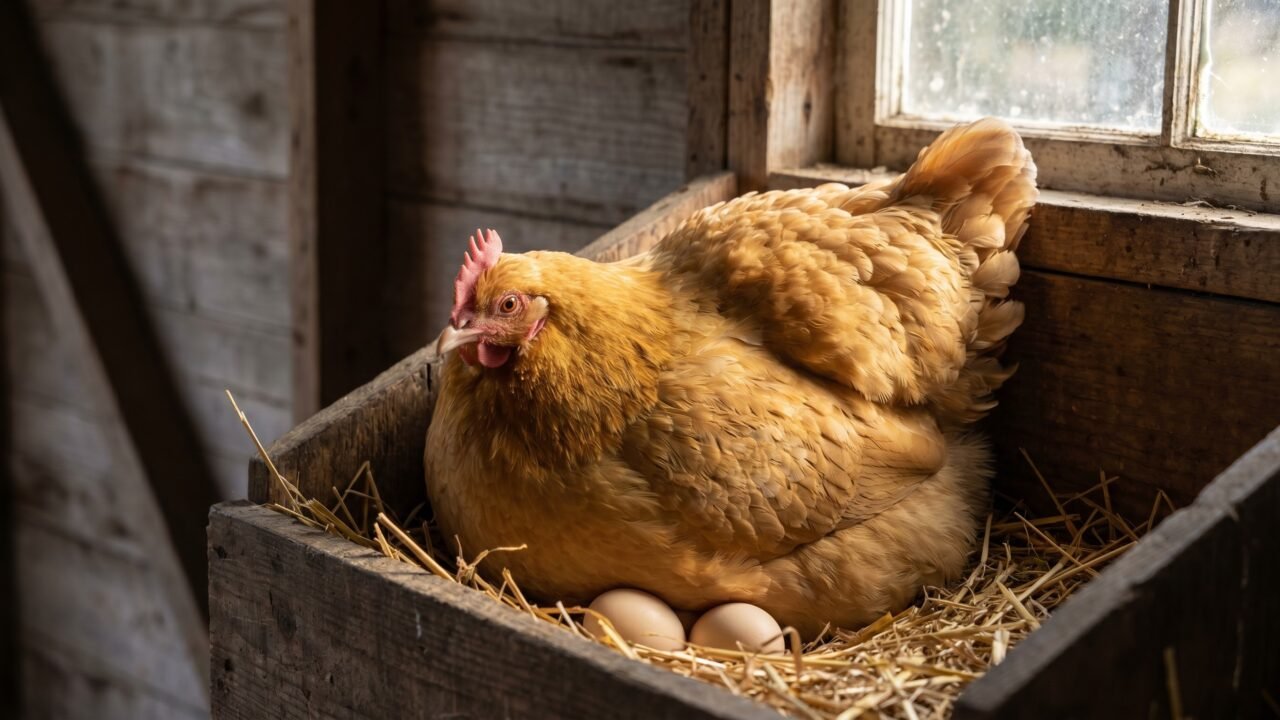
Choose a large, healthy hen from a breed known for broodiness - Silkies, Cochins, Buff Orpingtons, or bantam varieties - and confirm she has crossed the hormonal threshold: she stops laying, returns to the nest immediately after being lifted off, puffs up when approached, and keeps a low persistent cluck. Half-hearted sitting that stops after two days is not broodiness; it is just a hen who likes that particular box.
Breed matters a great deal here. Silkies and Cochins - both standard and bantam sizes - go broody most reliably and tend to be attentive mothers through hatch and beyond. Buff Orpingtons, Australorps, and most bantam varieties will go broody reasonably often. Production-focused breeds like Leghorns and commercial sex-links have had broodiness largely selected out and rarely commit to the full 21 days. If your flock skews toward production breeds, plan on an incubator as the main tool and treat any broody as a welcome bonus. Our piece on what to do when a hen goes broody covers the fuller decision of whether to let her sit or break the cycle.
Body condition matters too. FAO's small-flock guidance specifies that a suitable broody hen should be "large (to cover and thus keep more eggs warm), healthy and preferably vaccinated." A hen who is underweight, recently treated for mites, or actively molting is a poor candidate. A 21-day sit stresses even a healthy bird; a compromised one may quit in week two.
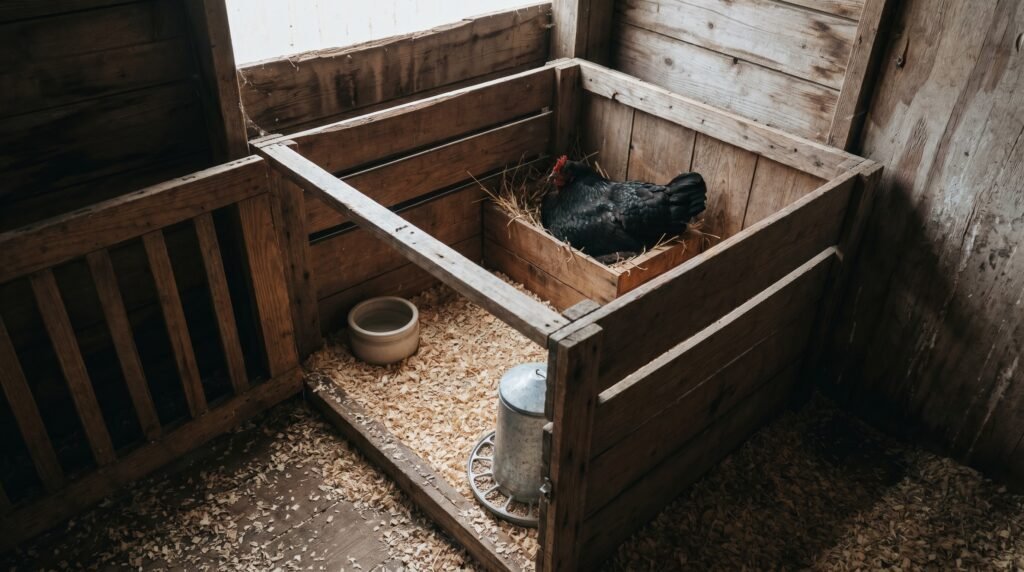
How should you set up isolation and how many eggs should you place?
Move your broody into a small, separate pen before flock-mates disrupt her. Give her a 12 by 12 inch nest box, fresh bedding, a shallow waterer, and food within a few steps of the nest - all in a dim, draught-free corner. For egg count, cap a full-sized hen at eight to ten and a bantam at six; more than that and outer eggs drift in and out of the warm brood patch.
A small pen or dog crate inside or next to the main coop works well. Mississippi State University Extension recommends giving broodies "dark, secluded areas in which to make her nest" so she "is not disturbed while setting on the eggs." A draught-free corner with dim lighting satisfies that requirement in most setups; a shallow waterer she cannot tip and food placed within a few steps of the nest complete the arrangement.
Move her at night when she is calmer. Lift her gently, transfer her to the new nest with the eggs already in place, and keep the space quiet. Most hens resettle within minutes. If she abandons the nest after the move, return her to the original location - some hens are too strongly bonded to the spot to shift. In that case, block other hens from the nest as best you can and accept a slightly messier hatch window.
How many eggs to set depends on the hen's size. Per FAO guidance, hatchability declines with more than ten eggs even though a standard hen can physically cover 14 to 16. Eight to ten eggs is the comfortable ceiling for a full-sized bird; every egg stays in steady contact with the brood patch. A bantam can manage six standard chicken eggs, and pushing past that just moves outer eggs in and out of proper warmth. A single Silkie bantam sitting ten eggs is doing more marketing than incubating.
If you want a clean set date - useful for planning chick care supplies and timing the candling check - use dummy eggs. Once your hen has been sitting steadily for 24 to 48 hours, swap the dummies for your stored fertile clutch all at once. That way every egg in the nest shares the same day zero. Mississippi State Extension's guidance for stimulating the setting instinct recommends exactly this approach: replace placeholder eggs with "the stored fertile eggs" once the hen begins incubating, so the good eggs arrive in peak condition.
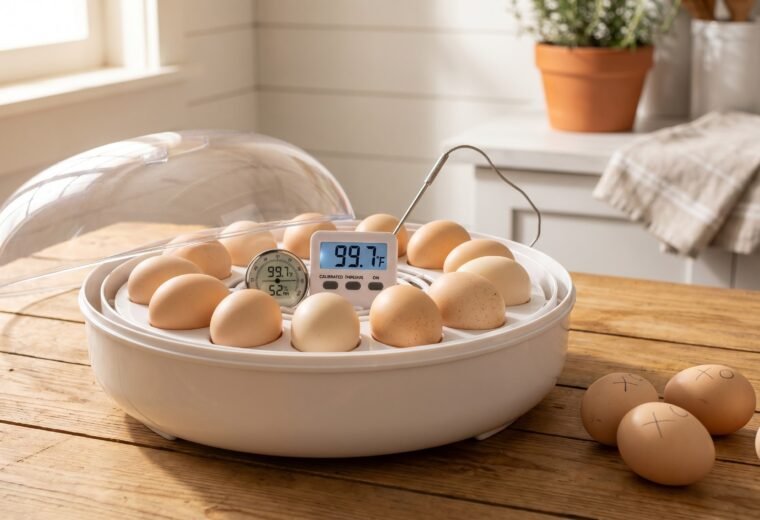
For egg storage before setting: keep them pointy end down at 60 to 69°F (Texas A&M AgriLife Extension's recommendation) and set them within seven days. Hatchability drops measurably with longer storage.
What happens across the 21-day timeline, and what should the keeper do?
For most of the 21 days your main job is to leave the hen alone. Embryos develop through distinct phases: blood vessels form in the first week, organs and feathers fill out through day 17, and the chick positions itself for hatch from day 18 onward. The table below maps each phase, what the hen is doing, and the handful of moments when your involvement actually helps. All milestone numbers come from MSU Extension's incubation guidance and FAO's small-flock chapter.
| Days | What is happening in the egg | What the hen is doing | Your action |
|---|---|---|---|
| 1-7 | Embryo forms; blood vessels develop; heart begins beating around day 2-3 | Sitting tight; turning eggs frequently; leaving once daily to eat, drink, and relieve herself | Confirm food and water are within easy reach; check once daily; candle on day 7 |
| 8-17 | Organs developing; feathers forming; embryo grows to fill most of the egg | Continuing to turn and incubate; may leave nest slightly less often | Minimal interference; optional second candle around day 14 if you want confirmation |
| 18 | Chick rotates into hatch position (head toward air cell); down beginning to form | Instinctively reduces turning and settles more deeply over the clutch | Nothing - do not disturb her; place chick waterer and starter feed nearby in advance |
| 19-20 | Internal pip (chick breaks into air cell); chick absorbs remaining yolk sac | May become very still and quiet; hens sometimes cluck softly to the eggs | You may hear faint cheeping from under her; leave her alone |
| 21 | External pip (first hole in shell); chick "zips" around and pushes out; dries and fluffs | Clucking increases; may stand to allow chicks to emerge; guards the nest | Do not assist a pipping chick; let all eggs hatch before removing unhatched ones (allow 24 hours past last hatch) |
A note on the "lockdown" concept: in an incubator, day 18 is a hard lockdown where you stop opening the unit and raise humidity sharply. A broody hen manages this transition herself. She naturally reduces turning around day 18, and her body maintains humidity. You do not need to intervene. What you should avoid is lifting her repeatedly during days 18 through 21, which disrupts the final critical phase when the chick is orienting itself inside the shell.
What does candling tell you at day 7, and when should you stop?
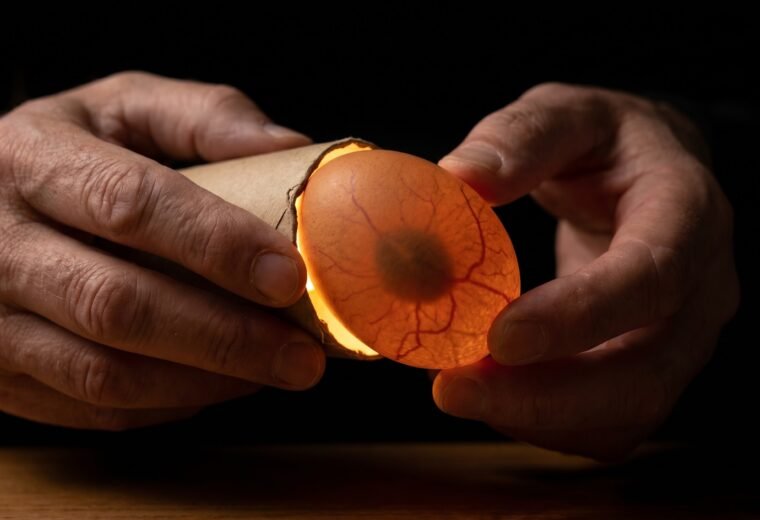
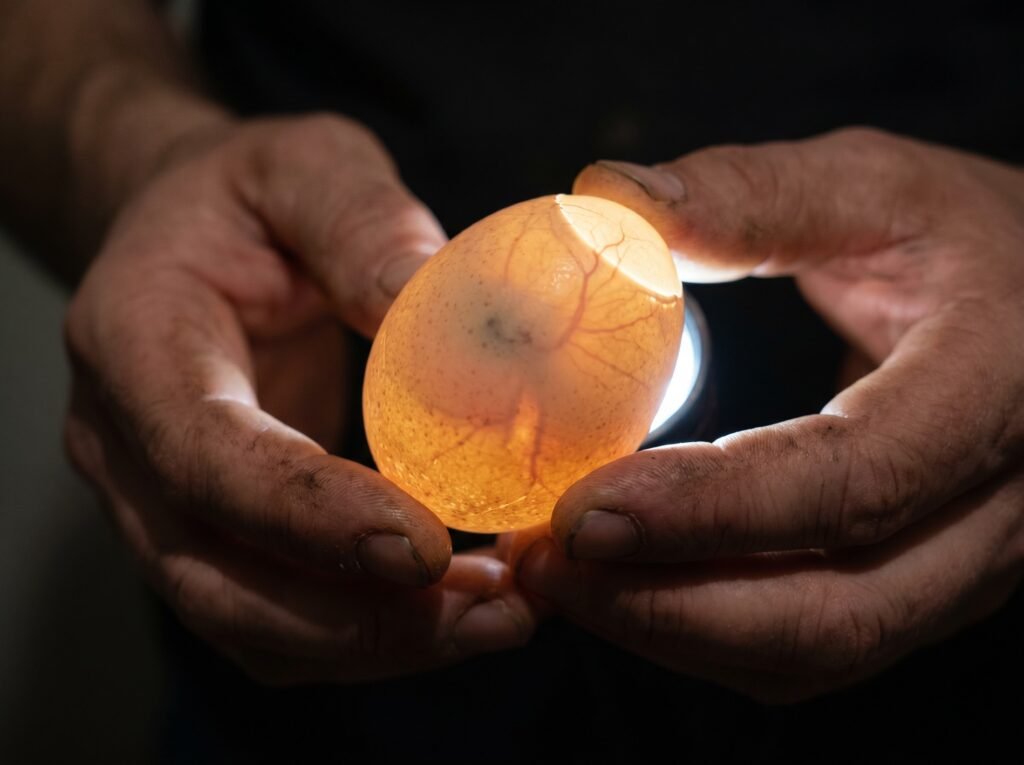
Candle at day 7 to find infertile and early-dead eggs before they rot and contaminate the rest of the clutch. Hold a bright light against the wide end of each egg in a darkened room: a developing egg shows a dark embryo surrounded by radiating blood vessels, while an infertile egg is clear with a freely drifting yolk shadow. After a second optional check around day 14, stop handling the eggs; disturbance in the final days adds no information and some risk.
An infertile egg looks clear - you can see the yolk shadow drifting freely, and per FAO's small-flock guidance a "completely clear (translucent) egg is infertile." Remove clear eggs promptly because a rotten egg can explode in the nest and contaminate the remaining clutch. A blood ring - a ring of vessels with no living embryo at the center - means the embryo died early. Remove that one too.
If you do a second candle around day 14, look for the chick filling more of the egg and the air cell distinctly larger than it was at day 7. After that point the air cell is still growing, the chick is absorbing the yolk sac, and there is nothing useful to see that justifies disturbing the nest.
By day 20, you may be able to hear faint cheeping from under the hen. That is the chick calling from inside the egg before it pips. Leave her be. If you see a small crack or dimple in a shell on day 20 or 21, that is the external pip - the chick has broken through and is working its way out. Do not help. The effort of pushing out builds the chick's strength and completes the yolk absorption it needs to survive the first 24 hours. Texas A&M AgriLife Extension is straightforward on this: "Do not help the chicks out of their shells."
What chick care does a broody mother handle, and what do you still need to provide?
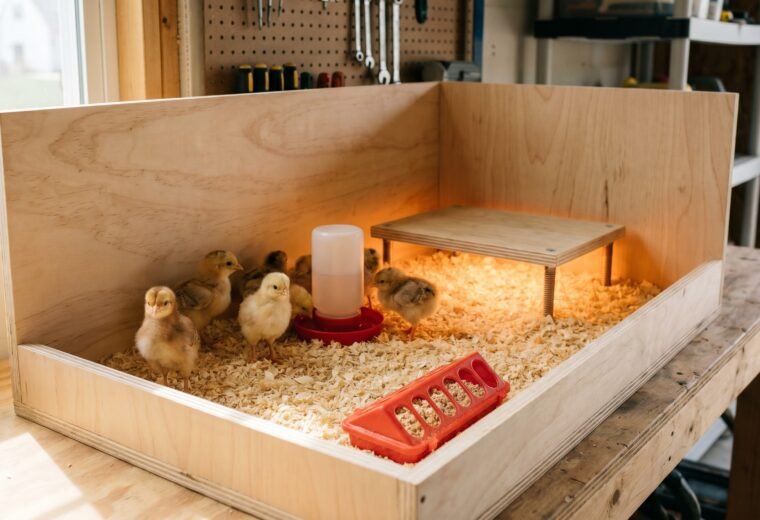
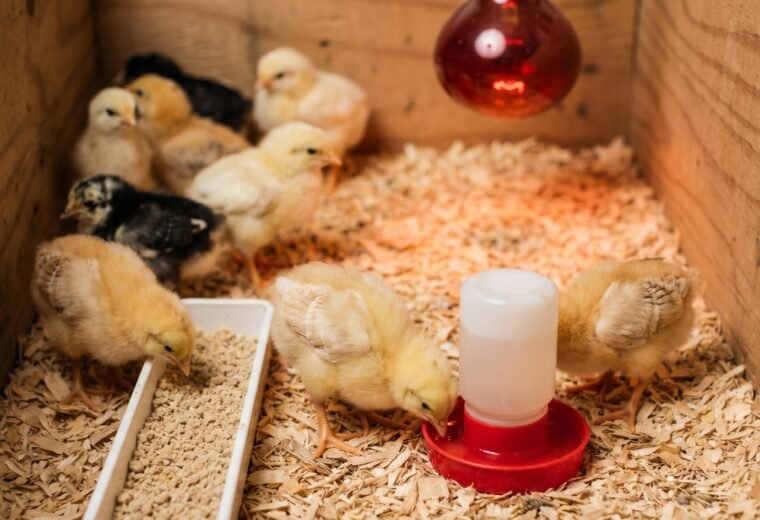
A broody hen manages warmth, brooding, and basic protection - she gathers chicks under her wings and self-adjusts as they need more or less heat. Your job before the hatch window opens is to ensure the right feed, water, and predator-proof space are already in place, because the hen cannot create those conditions for herself. Three things to confirm in advance are covered below.
Feed. Switch the isolation pen to chick starter - approximately 18 to 20 percent protein - before any chick hatches. The hen will eat it too, which is fine; she is not laying while she is brooding, so the lower calcium content poses no problem for her. Layer feed, on the other hand, has calcium levels (typically over 3 percent) that are too high for newly hatched chicks and can stress their kidneys and developing bones over time. Use chick starter for the entire pen for the duration of brooding. University of Florida IFAS Extension recommends feeding chick starter for the first six to eight weeks, with a starter protein of around 20 percent.
Water. Use a shallow chick-safe waterer - nothing a day-old chick can drown in. A standard fount with the base filled so only a narrow channel of water is accessible works well. Place it at ground level so the hen can drink without leaving the brooder area and chicks can reach it from day one. Fresh water every day.
Space and predator protection. Newly hatched chicks are tiny and fast. Hardware cloth around the isolation pen prevents them from slipping through gaps. It also keeps out any flock members or pets that might harm them before the hen has established her protective routine. If any stragglers need supplemental heat, the brooder setup steps in raising chicks walk through what that looks like in practice.
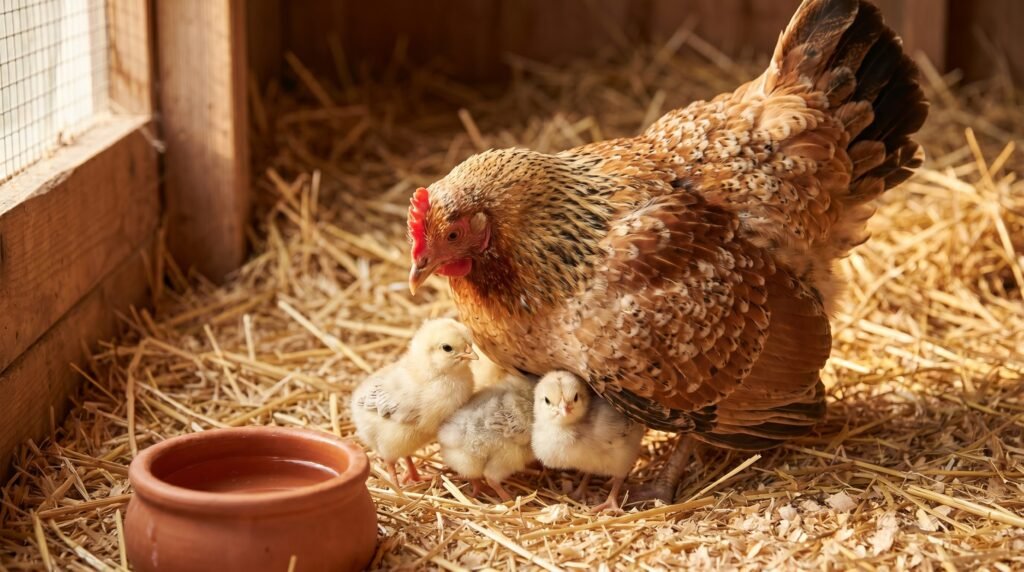
The hen handles warmth. She broods her chicks - gathering them under her wings for warmth - just as she incubated the eggs. In a typical situation, chicks raised under a broody need no heat lamp. The hen self-adjusts: chicks that are cold push under her, chicks that are warm scatter to the edges. What she cannot do is warm chicks if the ambient temperature is below freezing and her body is covering more chicks than she can keep warm. In cold climates, a nighttime check during the first week is sensible - just to confirm no chicks are piling up outside her reach. For a fuller week-by-week picture of chick development, our week-by-week chick guide tracks what changes in the brooder from day one through six weeks.
Unhatched eggs. By 24 hours after the last hatch, any remaining unhatched eggs are almost certainly not going to hatch. Remove them at that point. Eggs that develop but fail to hatch - called "late dead" - are common causes of nest contamination if left too long.
When and how do you reintegrate the hen and chicks into the main flock?
Keep the family unit in its isolation pen for the first two to three weeks. The established flock enforces its pecking order on sight, and a day-old chick cannot navigate that safely even with a protective mother nearby. From week three to four onward, begin supervised daytime access to the main pen with a retreat available; by week five to six the family typically merges naturally as the broody loses interest in active brooding.
Many keepers begin letting the family group have supervised access to the main pen during the day once chicks are recognizably bird-shaped and quick on their feet. The hen continues to deter most aggression. The chicks' integration at that stage benefits from the pecking order basics covered in our article on raising chicks safely.
A practical note on feed during reintegration: if the main flock is on layer feed, keep the chick starter in a feeder the chicks can reach but the adults cannot easily dominate. Some keepers use a raised feeder with an entrance height the adults will not bother to duck through. The chicks need starter through at least six to eight weeks; switching them to layer feed too early is one of the more common and easily prevented mistakes.
What if the hatch rate is lower than expected?
A 75 to 80 percent hatch of set eggs is the benchmark for natural incubation. If you set nine eggs and seven hatch, that is a normal result, not a failure. Rates consistently below 50 percent with a healthy, committed broody usually point to egg age before setting, low rooster fertility, or temperature spikes - all of which are fixable before the next clutch. Several specific factors lower the rate in practice:
- Egg age before setting. Eggs stored more than seven days before going under the hen hatch at lower rates. Hatchability declines further beyond ten days.
- Hen abandonment mid-incubation. A first-time broody or one disturbed repeatedly may quit. Isolation and minimal interference reduce this risk but do not eliminate it.
- Fertility of the rooster. Even a vigorous rooster does not fertilize every egg. Candling at day 7 tells you your actual fertile percentage.
- Temperature extremes. A nest in full afternoon sun can spike above safe incubation temperatures. MSU Extension notes that "many embryos die if held at 105°F for 30 minutes." Position the isolation pen out of direct sun.
- Egg quality. Cracked, misshapen, or excessively dirty eggs hatch poorly. Select eggs before setting - clean, intact, normally shaped, and from known healthy hens.
If you are consistently seeing hatch rates below 50 percent with a healthy, committed broody and good-quality eggs, the most likely culprits are either low rooster fertility (candle to check) or egg handling before setting (storage temperature and duration). Both are fixable before the next clutch.