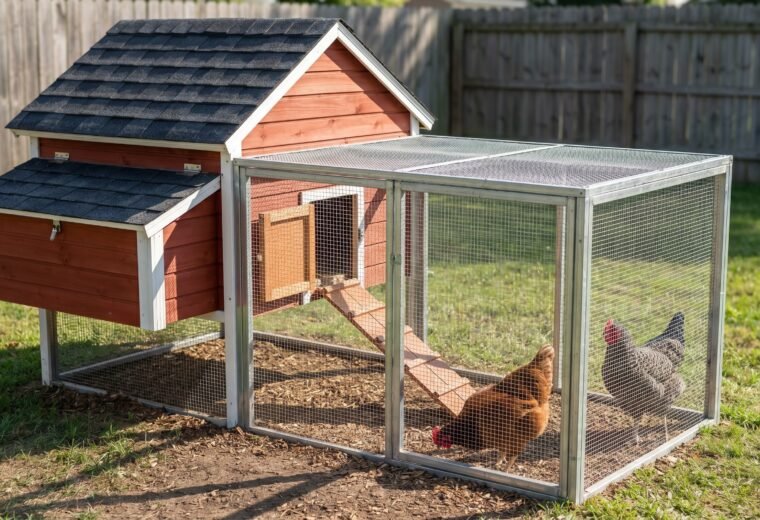
Ten hens need roughly 40 square feet of indoor coop space and 100 square feet of run. Get that math right before you cut a single board, and the rest of the build falls into place. This guide walks you through every step - sizing the footprint, framing walls, fitting nest boxes and roosts, cutting ventilation, and finishing a predator apron that keeps diggers out. We also cover five plan templates with standard dimensions and cut-list references, sized from a starter 4x4 up to a walk-in 8x12, so you can start building this weekend.
If you want to skip the build entirely and compare ready-made options, see our coop overview. Already built? Jump to ventilation setup or full predator-proofing details.
Step 1: Size the footprint before anything else
Overcrowding is the single biggest beginner failure in coop building - birds crammed into too little space develop stress behaviors, disease spreads faster, and the ammonia level climbs. The space math is simple once you know the floor: allow at least 3-4 square feet per hen inside the coop, and 10 square feet per hen in an attached run. That guidance comes from university poultry extension research and holds for standard-size laying breeds.
Bantams need a bit less. Heavy dual-purpose breeds need a bit more. And "minimum" really does mean minimum - experienced keepers nearly always say they wish they had gone larger.
Use this table to size your coop before you buy a stick of lumber.
| Flock size | Min. coop floor (sq ft) | Min. run area (sq ft) | Suggested coop footprint | Suggested plan size |
|---|---|---|---|---|
| 2-4 hens | 12-16 | 20-40 | 4x4 | Starter / tractor |
| 4-6 hens | 18-24 | 40-60 | 4x6 or 4x8 | Small backyard coop |
| 6-10 hens | 24-40 | 60-100 | 4x8 or 6x8 | Medium coop |
| 10-16 hens | 40-64 | 100-160 | 8x8 or 8x10 | Large backyard coop |
| 16-25 hens | 64-100 | 160-250 | 8x12 or 10x12 | Walk-in coop |
One planning note: a flock almost always grows. Build for the number of birds you plan to have in two years, not the six chicks you're starting with today.
Step 2: Choose your free plan
You do not need to design from scratch. These five plan templates cover the most common backyard flock sizes, with standard dimensions and cut-list references you can bring to any lumber yard. All are based on publicly available university extension and agricultural plans. Pick the footprint that matches your sizing table above, then follow this guide to execute the key systems - ventilation, nest boxes, roosts, and predator defense - correctly regardless of which plan you use.
- 4x4 starter / tractor - 2-4 hens, portable on skids. Good first build. Search "Mississippi State University 6248 poultry house plan" for their official 10x12 version, or use the freely available 4x4 tractor plans from university extension catalogs.
- 4x8 small backyard coop - 4-6 hens, stationary. Straightforward gable roof, side nest box access. Many free PDFs with cut lists are available through agricultural extension sites.
- 6x8 medium coop - 6-10 hens. Allows a proper walk-in pop door, good wall height for ventilation along the eaves.
- 8x10 large backyard coop - 10-16 hens. Worth adding a real person-door so you can stand up and work inside.
- 8x12 walk-in coop - 16-25 hens. Mississippi State Extension publishes construction details for this footprint. The walk-in format makes cleaning and health checks far easier at this scale.
Whatever footprint you choose, the build sequence below applies. The systems matter more than the exact dimensions.
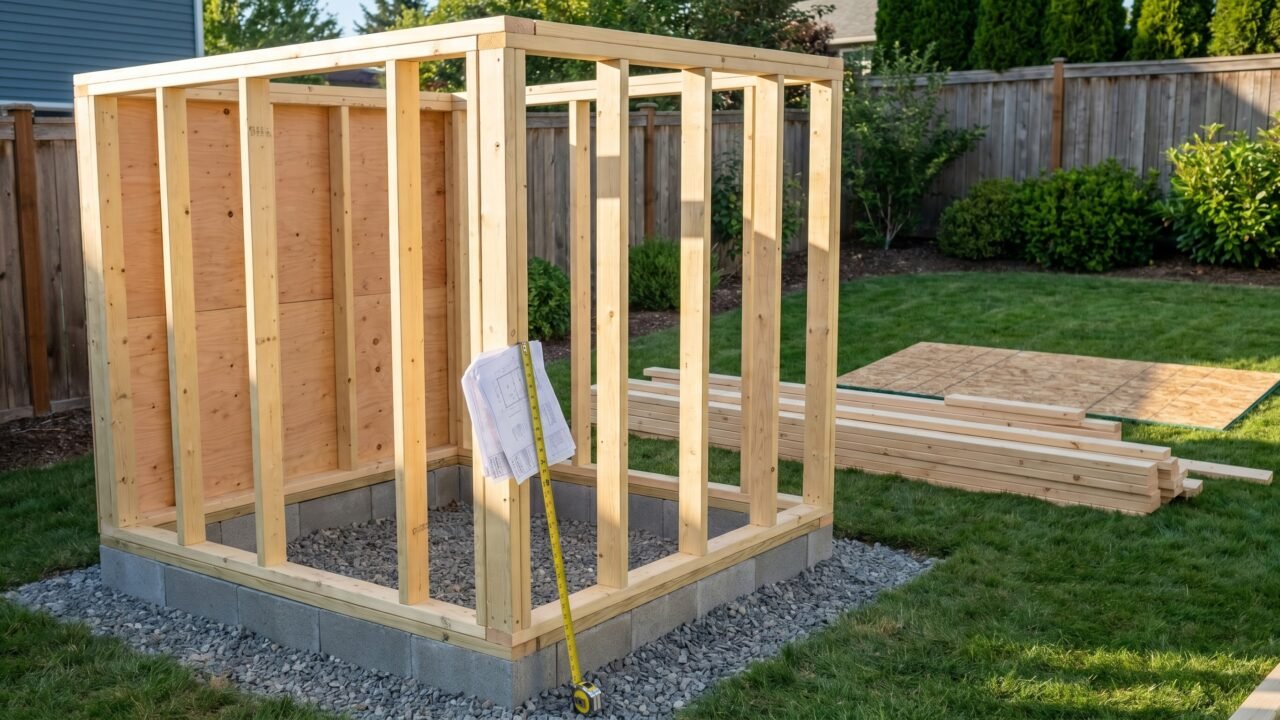
Step 3: Frame the walls and roof
Most backyard coops use standard 2x4 framing on 16-inch or 24-inch centers, just like a small shed. Pressure-treated lumber is worth the extra cost for the bottom plate (the board that sits on or near the ground) since it resists rot and insect damage. The rest of the framing can be untreated construction-grade dimensional lumber.
Wall height matters for ventilation. Aim for a minimum of 6 feet at the eave on a gable-roof design - this gives you enough vertical space to run vents high on the wall above roost height, while keeping the roof tight against rain. A shed-roof (one slope) design is simpler to frame and still works well for smaller coops.
Flooring options and their tradeoffs:
- Raised wooden floor on joists - Keeps bedding dry, discourages rodents nesting underneath if you close the gap. Use 3/4-inch exterior-grade plywood. Paint or seal the top surface so urine does not rot the wood.
- Dirt floor - Zero material cost. Chickens can dust-bathe naturally. Harder to clean and easier for predators to dig into unless you add a hardware cloth apron (see Step 7).
- Concrete slab - The most durable and predator-proof, but adds real cost and requires permanent placement. Worth it for a large permanent coop.
Sheathe the exterior with 1/2-inch exterior plywood or oriented strand board (OSB), then add a weather-resistant barrier and your choice of siding. Coop interior walls can stay unfinished, but a coat of white paint on the inside reflects light and makes inspections easier.
Step 4: Install nest boxes
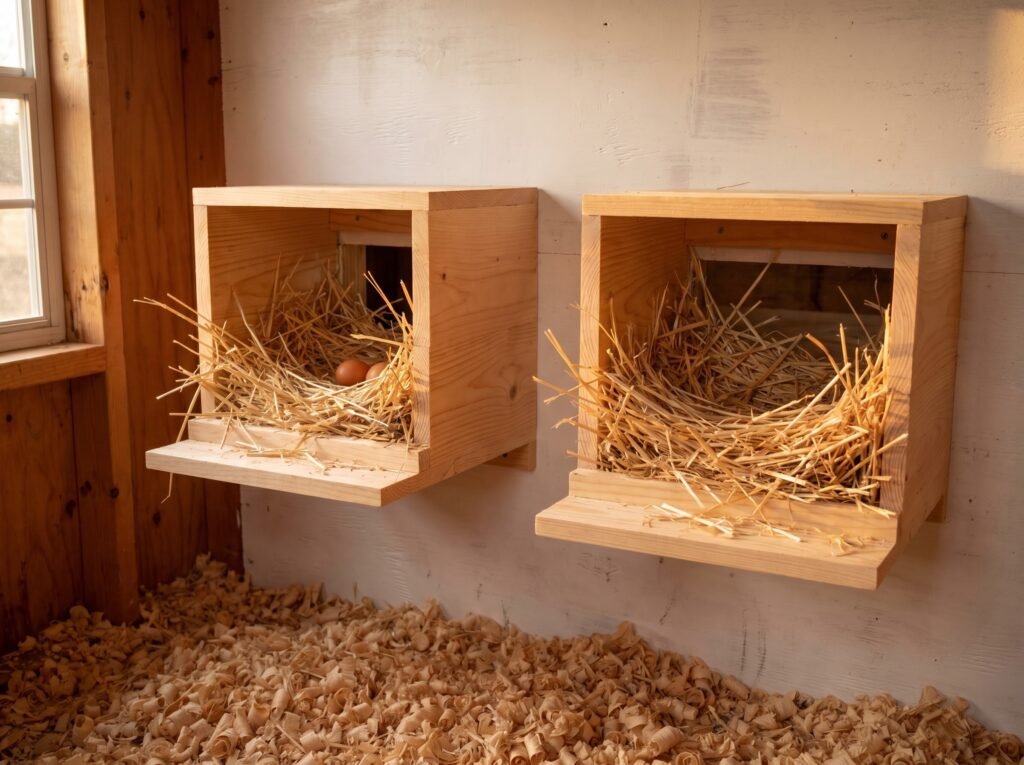
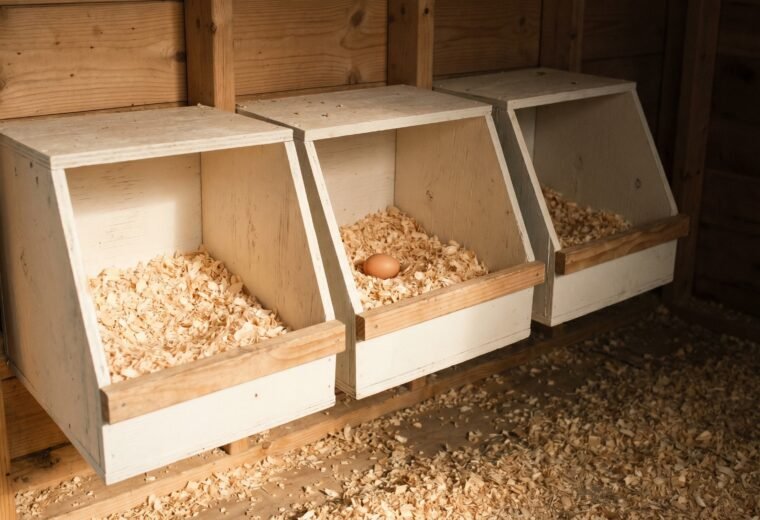
Nest boxes are where hens lay, so getting the sizing and number right directly affects how many eggs end up on the coop floor (broken, dirty, or eaten) versus in your basket. Penn State Extension and the University of Georgia Extension both put the minimum box size at 12x12 inches - that is the inside dimension. Larger breeds like Jersey Giants or Brahmas appreciate 14x14 inches.
The ratio: plan on one nest box for every four hens. So a ten-hen flock needs at least three boxes. Materials, litter depth, and curtain options are all part of the nest box picture - the nest box guide picks up right where this step leaves off.
Key placement rules:
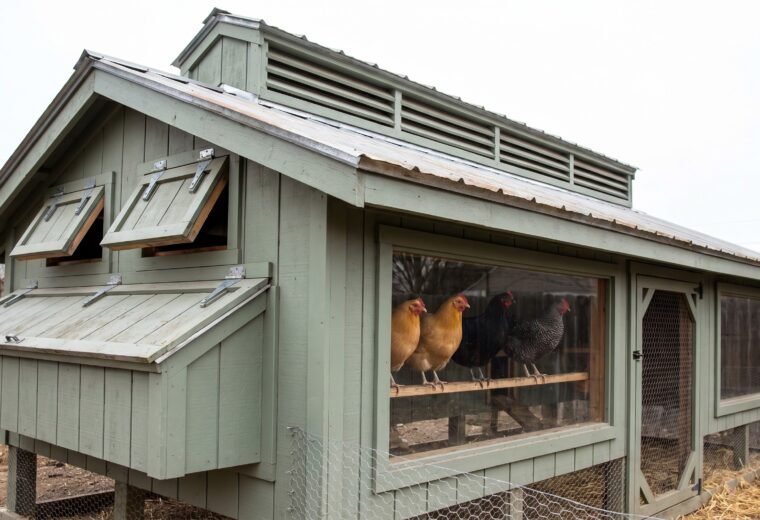
- Mount the boxes 18-24 inches off the floor. University of Georgia Extension recommends this height range and specifies fitting a 4-inch landing perch in front of each opening so hens can step in without scrambling.
- Position boxes lower than the roost bars. Roost bars should sit toward the top of the 18-24 inch range, always well above the nest box openings. Chickens instinctively want to sleep at the highest available spot. If the nest boxes are even close to roost height, hens sleep in the boxes, fill them with droppings, and egg quality crashes. Keeping a clear gap of at least 6 inches between box tops and roost bars removes that temptation.
- A hinged exterior lid ("egg door") lets you collect eggs without walking into the coop. Worth the extra hour of carpentry.
- Keep nest boxes dim. A small curtain or partial hood over each opening encourages use and reduces egg eating.
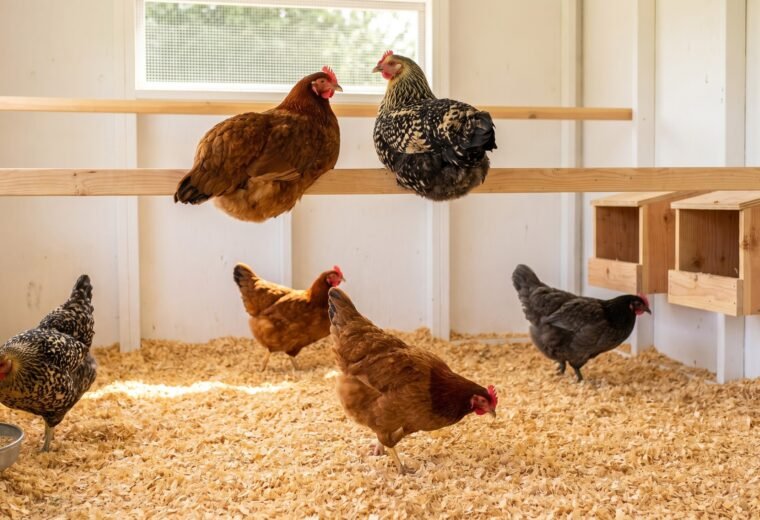
Step 5: Build and position the roosts
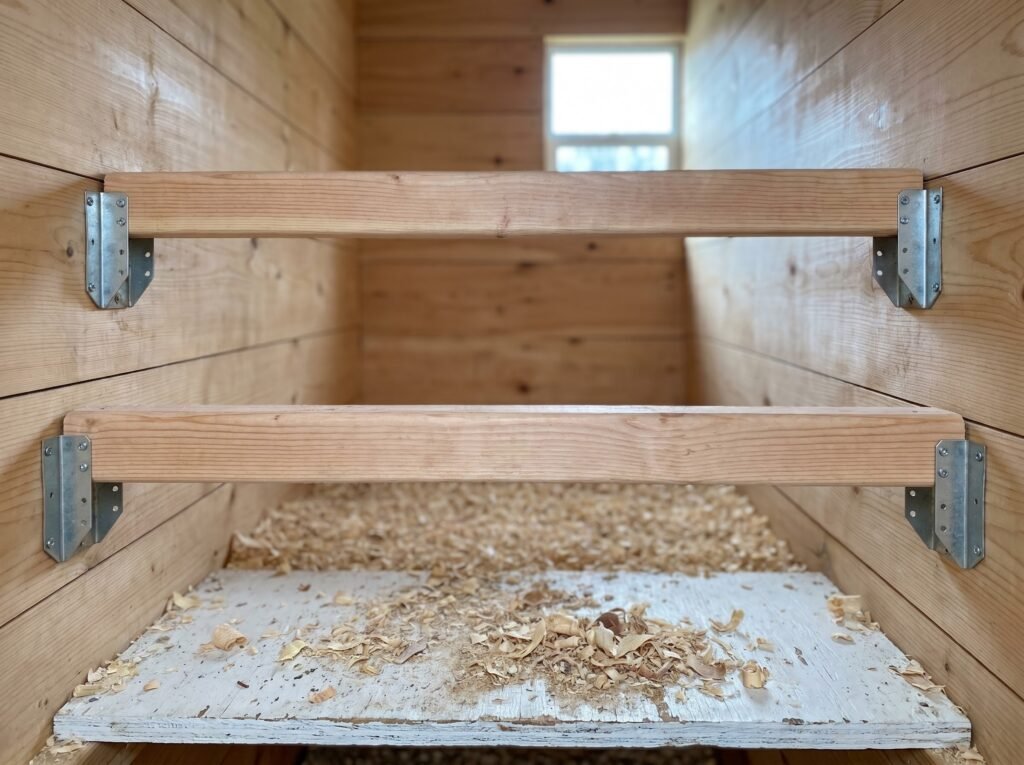
Roosting is how chickens sleep - perched off the floor with feet gripping a bar. A hen that cannot roost will squat in bedding or in nest boxes, both of which cause sanitation problems. Roost bars should sit 18-24 inches above the floor, spaced 12 inches apart from front to back, and positioned away from nest boxes - always above the nest box level so hens choose the roost over the box at night. Penn State Extension sets this range as the standard.
Roost bar space per bird: plan on 8-10 inches of linear bar per standard hen - that is the working target for a comfortable flock. Penn State cites 6 linear inches as a bare minimum for very cramped retrofits, but 8-10 inches is the figure to build to, and the higher end of that range helps in cold climates where birds fluff out and take up more space. Roost bar layout and spacing diagrams are covered step by step in the week-by-week setup for roost bars.
Material: a 2x2 or 2x4 board works well. Round the top edges lightly with a sander so the bar is comfortable underfoot but not so narrow that it stresses the bird's toes. A completely round dowel rod is harder for chickens to grip than a flat-topped board. Do not use a round metal rod - it gets cold in winter.
Stagger roosts in a ladder arrangement if you have multiple bars. The highest bar fills first; lower bars give lower-ranking birds somewhere to go. Set the highest bar at least 18 inches from the wall so birds have room to land without hitting it.
Step 6: Cut the ventilation
Ventilation is the most under-built feature in DIY coops - and the most consequential. Moisture and ammonia from droppings build up fast in an enclosed coop. The main function of a ventilation system, per extension poultry researchers, is to maintain adequate oxygen levels while removing carbon dioxide, moisture, dust, and odors. A coop that smells of ammonia when you open the door is under-ventilated, and that ammonia damages the birds' respiratory systems long before it kills them.
A practical starting point: extension poultry educators commonly target at least 1 square foot of open vent area per bird in the flock; add more if you live somewhere humid. By that measure, a 4x8 coop housing eight hens needs roughly 8 square feet of open vent area - more than most first-time builders expect.
Where to cut the vents matters as much as how much:
- High vents (near the ridge or in the gable) - These are your primary exhaust. Warm, moist, ammonia-laden air rises and exits here. Keep them open year-round, even in winter.
- Low vents or windows - Fresh air intake. Positionable windows let you adjust airflow seasonally. In summer, open fully. In winter, open slightly on the side away from the prevailing wind.
- Draft vs. ventilation - The distinction matters. A draft hits birds directly at roost level and chills them. Ventilation moves air above the birds and out the top. Healthy chickens tolerate cold well if the coop is dry and draft-free; they do not need supplemental heat in most climates. A well-ventilated coop without a heat lamp is safer than a warm, damp coop with one.
Cover all vent openings with 1/2-inch hardware cloth to keep predators out. Do not use screen window mesh - it clogs with dust and restricts airflow. Our ventilation deep-dive covers sizing and seasonal management in detail.
A note on heat lamps: Fire-safety and combustion references put a heat lamp bulb surface well above 480°F, while dry wood bedding (pine shavings) ignites at roughly 450-500°F - a margin far smaller than most keepers realize. The risk is real. Most adult laying hens do not need supplemental heat above 0°F. If you live somewhere genuinely extreme, a low-wattage flat-panel radiant heater mounted flush on the wall is a safer option than a hanging heat lamp.
Step 7: Install the predator apron

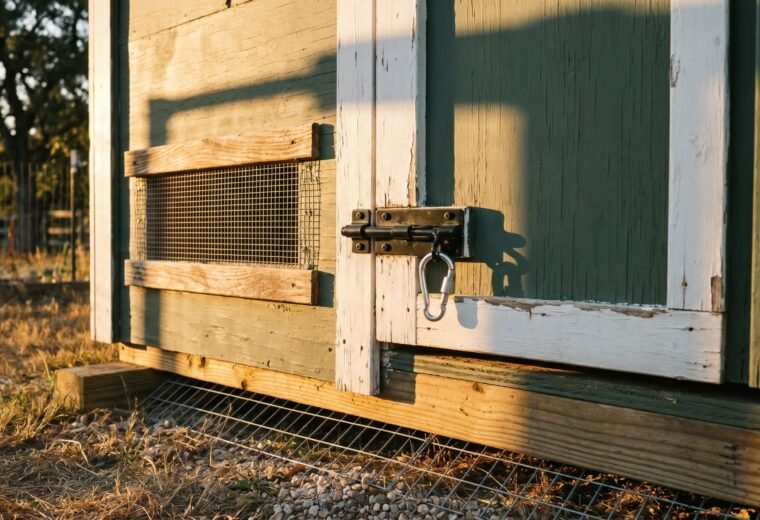
The predator apron is the buried or surface-laid mesh skirt around the base of the coop and run. It is the single most effective defense against the diggers - foxes, raccoons, skunks, and rats - and it is the step most first-time builders skip. Poultry extension researchers specify burying hardware cloth at least 12 inches (30.5 cm) into the ground around the perimeter. If you do not want to dig a trench, you can lay the mesh flat on the ground surface, extending 12 inches outward from the wall, and peg it down with landscaping staples. Grass grows through it within a season and holds it in place.
Hardware cloth vs. chicken wire: use hardware cloth. Chicken wire keeps chickens in but does not keep predators out. Weasels and mink can squeeze through chicken wire openings. Raccoons reach through and grab birds. Hardware cloth with 1/2-inch or 1/4-inch openings is the correct material for any predator-exposed surface. For more context on the full predator threat picture, see our predator-proofing guide.
Other predator-proofing essentials:
- Pop door - The small door birds use to enter and exit. Close it every night at dusk. Raccoons and foxes do most of their hunting after dark. An automatic door opener on a timer or a light sensor is one of the best investments you can make - it removes the one nightly task you will eventually forget.
- Hardware cloth on all openings - Windows, vents, and the run ceiling. Cover the top of the run with hardware cloth or welded wire to stop hawks and owls.
- Raccoon-proof latches - Raccoons can open simple slide bolts. Use a carabiner clip or a two-step latch that requires opposable thumbs to open.
- Coop elevation - Raising the coop floor at least 12 inches off the ground discourages rats and skunks from nesting underneath.
Materials list and cost breakdown
Costs vary by region and whether you source salvaged material. These figures reflect new-material prices in a typical US market and should be treated as planning estimates, not fixed quotes.
| Material | 4x8 coop (4-6 hens) | 8x10 coop (10-16 hens) | Notes |
|---|---|---|---|
| Framing lumber (2x4, 2x6) | $80-120 | $180-260 | More for pressure-treated base plate |
| Sheathing (3/4" plywood, OSB) | $60-100 | $140-200 | Exterior-grade for floor |
| Roofing (metal or asphalt) | $50-100 | $100-200 | Metal lasts longer, worth the premium |
| Hardware cloth (1/2" openings) | $60-120 | $150-300 | Do not substitute chicken wire |
| Nest box lumber | $20-40 | $30-60 | Pine 1x8 or 1x10 |
| Roost bars | $5-15 | $10-25 | 2x2 or 2x4 pine |
| Hardware (screws, hinges, latches) | $30-60 | $50-100 | Galvanized for exterior |
| Paint / sealant | $20-40 | $30-60 | Exterior latex; seal floor |
| Pop door + hardware | $15-30 | $15-30 | Optional auto-opener adds $60-150 |
| Total estimate (coop only) | $340-625 | $705-1,235 | Run adds $200-600+ depending on size |
Salvaging used lumber, reclaimed windows, or a repurposed garden shed can cut these figures by 40-60%. The one place not to economize: the hardware cloth. Cheaper woven wire costs you in dead birds.
The build sequence, condensed
- Set the foundation. Level the site. Pour concrete blocks, set a pressure-treated skid, or pour a slab. Raise the floor frame at least 12 inches off the ground if using a wood floor.
- Frame and sheathe the walls. Standard 2x4 framing on 16-24 inch centers. Frame rough openings for windows, vents, pop door, and person door before sheathing.
- Frame and sheathe the roof. A simple gable or shed roof works for any size up to 10x12. Overhangs of 12-18 inches on the south and west sides shed rain off the walls.
- Install roofing. Metal corrugated roofing is durable and sheds snow easily. Asphalt shingles work but need a steeper pitch (4/12 minimum) to shed properly.
- Fit vents and windows. Cut vent openings near the ridge and along the eaves, cover with 1/2-inch hardware cloth, add operable framing around windows for seasonal control.
- Build and mount nest boxes. Attach to the interior wall at approximately 18 inches off the floor, clearly below the roost bar height. Add the exterior egg door if using one.
- Install roost bars. Set the highest bar at least 24 inches above the floor - above the nest box openings - parallel to the nest box wall or on the opposite wall. Space multiple bars 12 inches apart, front to back.
- Hang the pop door. Cut it at chicken shoulder height (roughly 12-14 inches wide by 14-16 inches tall for standard breeds). Add a slide or swing mechanism and a secure latch.
- Lay the hardware cloth apron. Dig or lay the 12-inch skirt around the coop perimeter and any attached run. Fasten to the base of the wall framing with staples and screws.
- Add bedding and do a walk-through check. Look for any gap larger than 1/2 inch that a predator could probe. Check that all latches are two-step. Confirm you can reach every corner for cleaning.
Common mistakes that cost money and birds
Building small is the most expensive mistake you can make. A coop that is too small gets replaced, not expanded - the framing rarely lends itself to addition. The second most common mistake is skipping the predator apron. A digger will find a dirt-floor coop without an apron within the first week of the flock being outside.
Under-ventilating ranks third. Builders see a warm, enclosed space and worry about cold birds. Cold is far less dangerous than ammonia and wet litter. If your coop smells when you open the door, your birds are breathing that all night. Add vents before you add any heat source.
Putting nest boxes too high is a subtler problem. Hens will use the highest spot as a roost whether you want them to or not. Keep the roost bars clearly higher than the nest box openings and you remove the temptation.
Once the coop is up and the flock is in, the next challenge is keeping things running smoothly through the seasons. Our article on predator proofing covers run design and overnight security in more depth, and the ventilation guide has seasonal vent management by climate.