Fresh air keeps chickens healthier than any heat lamp ever will. Poor ventilation kills more backyard flocks slowly - through respiratory disease, frostbite, and chronic ammonia exposure - than cold weather ever does directly. Getting airflow right is the single most impactful upgrade you can make to an existing coop, and the most important design decision in a new one.
The core principle, confirmed by poultry extension services at Virginia Tech and the University of Maryland, is simple: ample air movement without a draft. Those six words contain almost everything you need. The rest of this guide is just working out what they mean in practice, for a flock of eight to 15 standard-size hens through all four seasons.
Why does ventilation matter more than a heat lamp?
Proper ventilation removes the moisture and ammonia that cause frostbite and respiratory disease - the real killers in backyard flocks. A fully feathered adult bird in a dry, draft-free coop handles cold weather far better than one in a warm, damp, sealed one. Getting air moving is almost always the higher-priority upgrade over adding heat.
Chickens are warm-blooded with a resting body temperature around 106-107°F. A fully feathered adult in dry conditions handles cold weather remarkably well. Virginia Tech Extension puts it plainly: "Poultry can handle cold very well if they are dry and are fully feathered." The University of Maryland Extension agrees, noting that "birds can handle cold temperatures only if kept dry."
What destroys that cold tolerance fast is moisture. Each bird exhales water vapor continuously, and chicken manure is roughly 70% water. In a coop holding 15 hens, that moisture has nowhere to go except into the litter and the air - unless ventilation removes it. When humidity builds and temperatures drop, that moisture condenses on surfaces and on the bare tissue of combs and wattles, causing frostbite. A flock shivering in a poorly ventilated, sealed coop faces more frostbite risk than one in an open-fronted shed in Maine.
Heat lamps introduce a separate problem. Fire safety organizations have documented them as a leading cause of agricultural fires. Straw, pine shavings, and feathers are all combustible; a lamp knocked from its mount or a failing bulb socket ignites them quickly. Cold-acclimated birds in draft-free shelters with dry bedding generally stay comfortable without supplemental heat in all but the most extreme climates - consistent with guidance from multiple extension services. If supplemental heat genuinely becomes necessary - typically only when coop temperatures fall below 35°F for extended stretches - a flat radiant panel mounted flush to a wall is far safer than a hanging heat lamp. The heat-vs-no-heat question goes deeper than ventilation alone; whether chickens need heat in winter walks through the full decision.
What is the difference between a draft and proper airflow?
A draft is cold air moving directly across roosting birds at speed, stripping the insulating layer their fluffed feathers create. Airflow is air that enters high, mixes across the coop volume, and exits through another high opening - removing moisture and ammonia without touching the birds below. Placement and height are the only things separating one from the other.
This is where most beginner coop designs go wrong. Ventilation and drafts both move air, but they affect birds very differently depending on where the air enters and at what velocity.
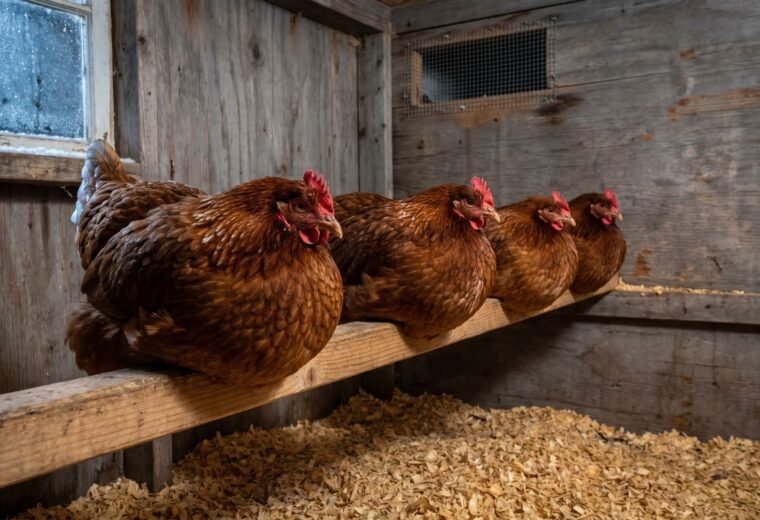
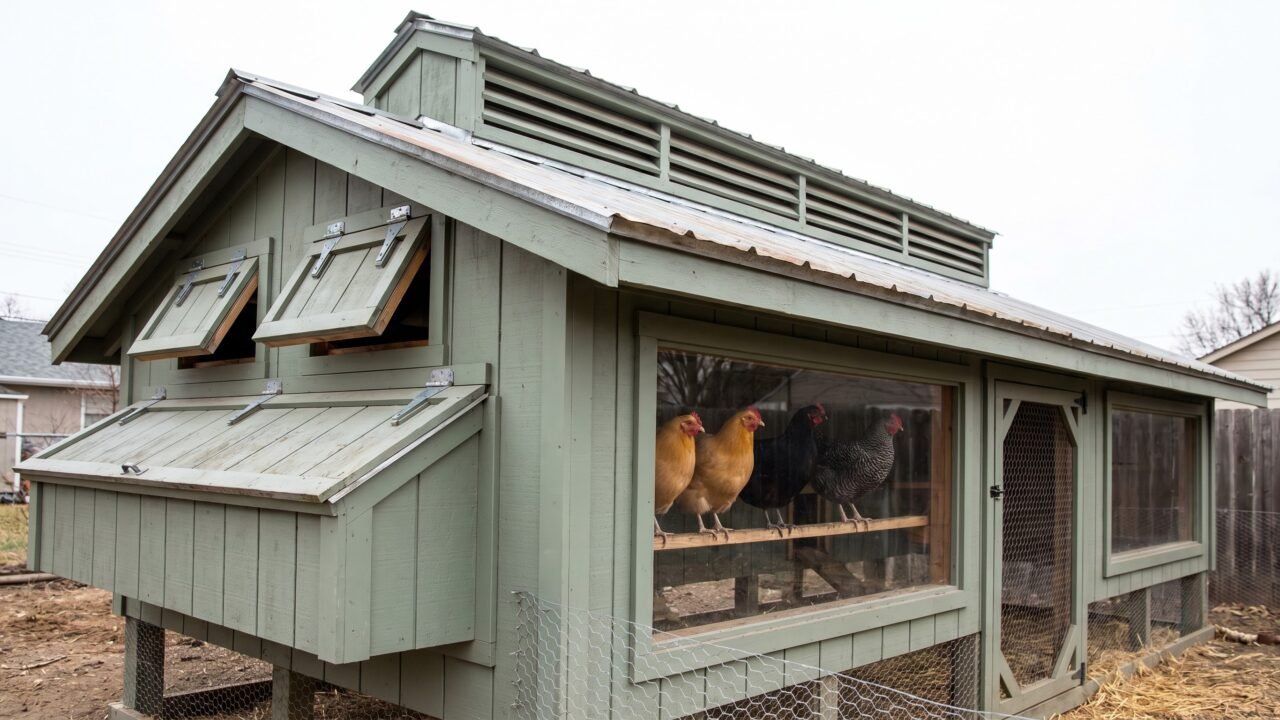
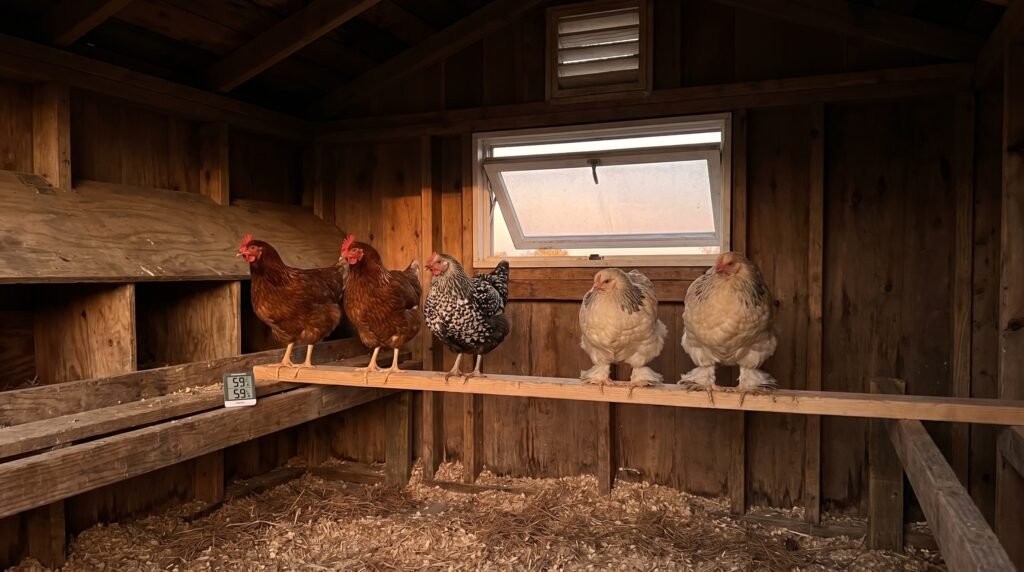
A draft is cold air moving directly across roosting birds at speed. Chickens perch at night with their feathers fluffed - the feathers trap warm air and insulate the bird. A draft blowing against a perched hen strips that insulated layer away and causes rapid chilling. The fix is straightforward: keep vents and windows from opening directly over the birds' perching area - a principle Virginia Tech Extension reinforces in its small-scale housing guidance.
Ventilation is air movement that enters high, mixes across the coop volume, and exits through another high opening, carrying moisture and ammonia out without touching roosting birds directly. Think of it as a slow river of air moving above head height while the birds sleep below it undisturbed.
The practical test is simple. Sit or crouch at roost height inside your coop on a calm evening. If you feel a sustained chill on your face, that is a draft - find the opening and either close it at night, deflect the air upward with a baffle, or relocate it above roost level. If you feel nothing but the air isn't stale, your ventilation is working.
Where should vents be placed in a chicken coop, and how big should they be?
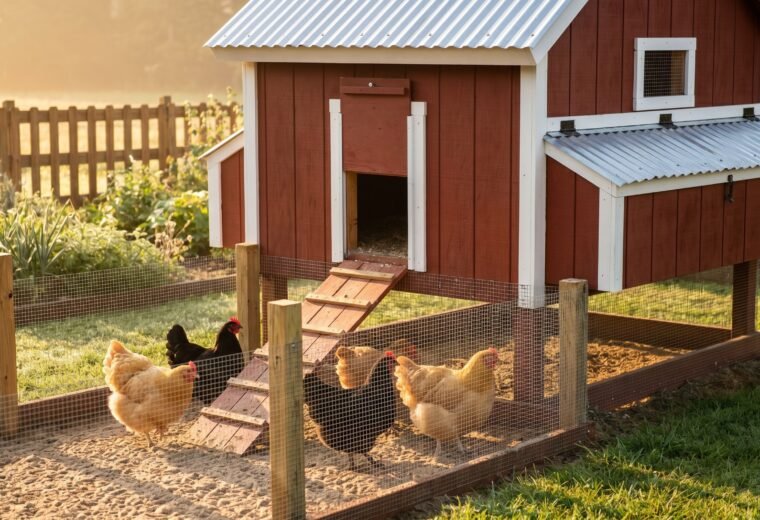
Place inlets high on the sheltered side of the coop - typically the south wall - and outlets at the highest point possible, such as a ridge vent or gable vent. This lets warm, stale air rise and escape while fresh air enters below it. Virginia Tech Extension specifically recommends south-facing windows for winter warmth and summer ventilation; east-facing placement follows the same logic of avoiding prevailing north and west winter winds.
For passive ventilation to work, you need both an inlet and an outlet, positioned so air flows through the coop volume rather than short-circuiting across a single wall. The most effective arrangement puts inlets on the sheltered side of the coop and outlets at the highest point possible - a ridge vent, a soffit vent under the eave overhang, or a high gable vent. Warm, stale air is lighter than cool fresh air; it naturally rises and exits through the highest openings, drawing fresh air in behind it.
Virginia Tech Extension recommends placing windows and vents on the south side of the house, away from prevailing winds. South-facing openings serve double duty: passive solar gain through winter glass, and cross-ventilation in summer when the sash swings open fully. East-facing placement follows the same sheltered-side logic - avoiding prevailing north and west winter winds - and is a common practical extension of that guidance.
For sizing, the widely circulated rule of thumb is roughly 1 square foot of vent opening per adult standard-size bird - a rule that appeared in several backyard poultry forums but does not trace to a specific extension publication. A more useful framework is to size vents generously and use adjustability rather than a precise formula, because the actual airflow needed depends on your climate, coop geometry, flock density, and litter management. In hot-summer climates, size toward the generous end and plan for supplemental fan cooling. In mild climates with good litter management, smaller fixed vents work fine year-round.
What the extensions do agree on is that adjustable ventilation - windows that partially open, vents with sliding covers - beats fixed holes because you can tune airflow to conditions. In winter you partially close vents to keep moisture moving out while preventing chilling air velocity. In summer you open everything.
One critical detail: count the free area of the opening, not the frame size. Screens and hardware cloth can significantly reduce effective airflow depending on mesh size and wire gauge - a tight mesh over a vent frame blocks a meaningful share of the opening. If your vent frame is 12 inches by 12 inches but half the area is mesh, plan accordingly.
How do ammonia and excess moisture harm chickens in a poorly ventilated coop?

Ammonia accumulates silently - by the time you can smell it clearly, concentrations are likely already causing tissue damage to your birds' airways. The Merck Veterinary Manual places the damage threshold at 25-30 ppm, and levels that injure eyesight start at 50-75 ppm. Moisture compounds the problem by keeping litter wet, which accelerates ammonia production and raises humidity to the point where frostbite risk climbs even without extreme cold.
Ammonia is colorless and accumulates gradually. By the time you notice the smell clearly, your birds have already been breathing harmful concentrations for hours. The Merck Veterinary Manual states that ammonia at 25-30 ppm damages the mucociliary apparatus of the upper respiratory tract - the hair-like cilia that sweep pathogens out of the airway. Once those cilia are compromised, birds become significantly more susceptible to respiratory disease. At 50-75 ppm, the Manual notes, ammonia causes caustic burns and corneal ulceration that can result in blindness.
Research on laying hens found they actively avoided compartments with ammonia concentrations as low as 10 ppm when given a choice, choosing fresh air instead. That behavioral response suggests 10 ppm is already aversive, well below the 25 ppm threshold where measurable tissue damage begins.
Ammonia comes from bacteria decomposing the uric acid in wet manure. The control levers are ventilation and litter dryness. Merck's guidance puts ideal litter moisture at 20-25%: grab a handful, squeeze it, and it should clump briefly and then crumble apart. Soaking wet litter is the primary ammonia engine. Regular cleaning and proper airflow work together - neither alone is enough. Deep-clean schedule and litter replacement timing come next in cleaning the chicken coop.
Relative humidity inside the coop is another practical marker. Alabama Cooperative Extension System guidance recommends maintaining coop humidity between 50-70% during cold weather. Readings above 70% consistently, especially when combined with cold surfaces, signal insufficient ventilation. A basic digital hygrometer placed at roost height gives you real data rather than guesswork.
Which vent types work best, and where should each one go?
Each vent type serves a different role - some work best as passive exhaust at the roof peak, others as adjustable inlets on sheltered walls, and some double as summer cross-ventilation. The table below maps each type to its best placement, primary season, and the one rule that determines whether it helps or hurts.
The table below maps vent type to its function, best season, and one critical placement rule. Use it alongside your coop layout when deciding where to cut openings.
| Vent type | Best placement | Primary season | Critical rule |
|---|---|---|---|
| Ridge vent (peak of roof) | Full length of roof ridge | Year-round (passive exhaust) | Cover with overhang to block rain; keep open in winter unless drafts develop |
| Soffit or eave vent | Under roof overhang, high on wall | Year-round (inlet) | Overhang must protect from direct rain and wind; place on south or east wall |
| Gable vent | High on end wall, above roost level | Year-round | Screen with 1/2-inch hardware cloth; adjustable louvers let you reduce flow in winter |
| Window (sash or awning) | South or east wall, above roost level | Summer primary, winter cracked | Never open directly over roosts; close or crack downward in winter to deflect air up |
| Pop-hole door | Low, facing run | Daytime only | Contributes airflow while open; not a substitute for high vents at night |
How do you keep a chicken coop ventilated in winter without freezing your flock?
The goal is minimum effective ventilation: enough air exchange to keep humidity below 70% and ammonia undetectable, while preventing cold air from blowing directly across roosting birds. Adjustable vents - not sealed coops, not wide-open windows - are the tool. Partially close them on bitter nights, open them wider on milder days, and always keep at least a crack of exhaust at the roof peak.
Winter is when beginner keepers make the most damaging mistake: sealing the coop tight to "keep the heat in." A sealed coop fills with moisture and ammonia within hours. High ammonia concentrations happen most in winter, precisely because people restrict ventilation to conserve warmth - which is why the Merck Veterinary Manual flags this as the season most likely to produce ammonia-related health problems.
The goal in winter is minimum effective ventilation: enough air exchange to keep humidity below 70% and ammonia below detectable levels, while avoiding air moving directly across roosting birds. University of Minnesota Extension recommends these practical approaches:
- Partially open a south-facing window just enough to allow moist air to escape, adjusting based on outdoor temperature and wind.
- Install roof vents with adjustable covers so you can dial back flow on brutally cold nights without closing completely.
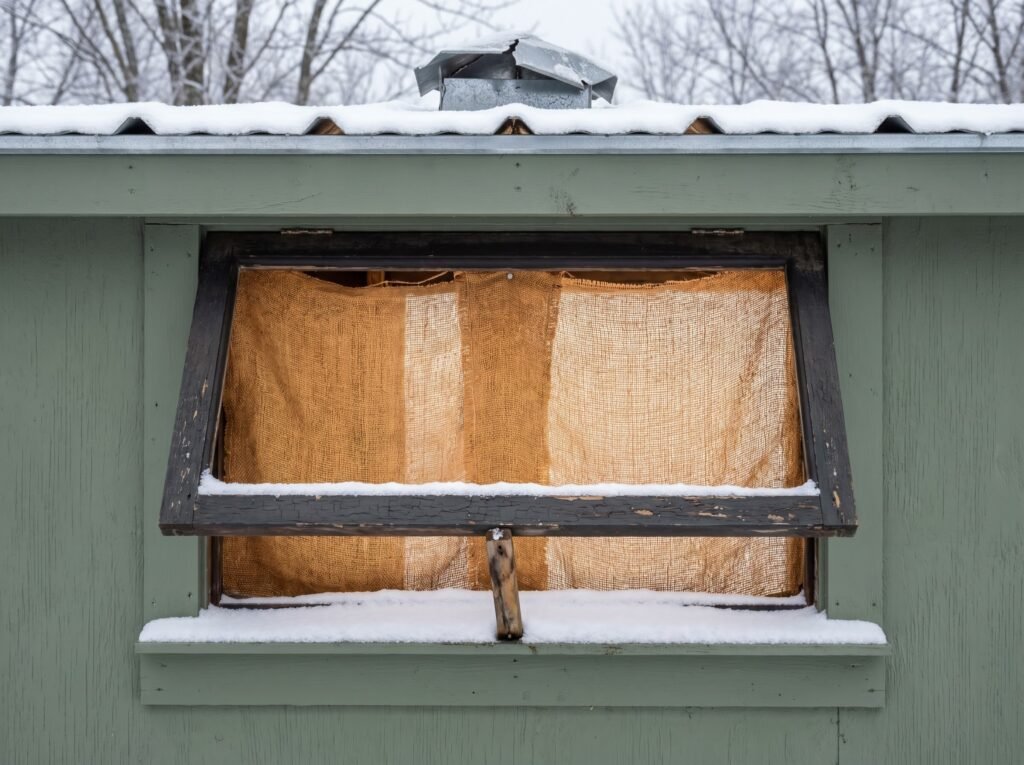
- Use a burlap panel or hardware cloth covered with burlap over a vent opening to break wind velocity while still allowing air exchange.
- On milder winter days (above 20-25°F with no wind), open a door or window fully for an hour to flush stale air.
Two field checks tell you if your winter ventilation is adequate. First, walk in early on a cold morning before the birds have been active long: if you smell ammonia, airflow is not enough. Second, look at your coop walls and ceiling for condensation or frost on cold days - either means moisture is accumulating faster than ventilation removes it. These same checks work as an ongoing indicator year-round, though ammonia peaks in winter when airflow is restricted and birds spend more time indoors.
Frostbite on combs and wattles almost always traces back to excess moisture, not cold air alone. Dry birds in well-ventilated coops rarely show frostbite even in hard winters. Large-combed breeds like Leghorns and Rhode Island Reds need particular attention to coop humidity. Cold-hardy breeds that handle frostbite better include pea-comb breeds like Buckeyes, rose-comb breeds like Dominiques, and dense-feathered breeds like Australorps - each achieves cold hardiness differently, but none handles sustained 80%+ humidity without cost. Breed selection and housing decisions fit together; the complete coop guide picks up that thread.
How do you audit an existing coop's ventilation to find what is missing?
Run seven quick checks covering outlet height, draft risk, adjustability, orientation, smell, litter condition, and humidity. Any check that fails points to a specific fix - usually adding or repositioning an opening, rarely closing one down. Extension services consistently find that keepers under-ventilate more often than the reverse.
Run through these checks to evaluate your current coop or plan a new one:
- High outlets exist: At least one vent or ridge opening sits above roost level on every exterior wall or the roof, allowing warm air to escape by convection.
- No vent opens directly above roosts: Air entering at roost height will hit roosting birds. Relocate, baffle, or angle it upward.
- Openings are adjustable: Fixed holes work in mild climates; in cold regions, covers or awning-style openers let you tune flow seasonally.
- South or east orientation: Primary inlets face away from prevailing winter winds (typically north and west in most of the US).
- Morning smell test passes: No detectable ammonia before morning chores; no visible condensation on cold surfaces.
- Litter crumble test passes: A squeezed handful clumps briefly, then crumbles. Wet clumping that holds its shape means moisture is too high.
- Hygrometer reads below 70%: At roost height, first thing in the morning, humidity should sit between 50-70%.
If your coop fails any of these checks, the fix is almost always more openings at higher positions, not less. Extension services consistently find that keepers under-ventilate more often than they over-ventilate. Cut a new gable vent, install an adjustable ridge cap, or replace a solid wall section with a hardware-cloth panel covered by a hinged board - and watch the ammonia smell and condensation disappear within a day or two.