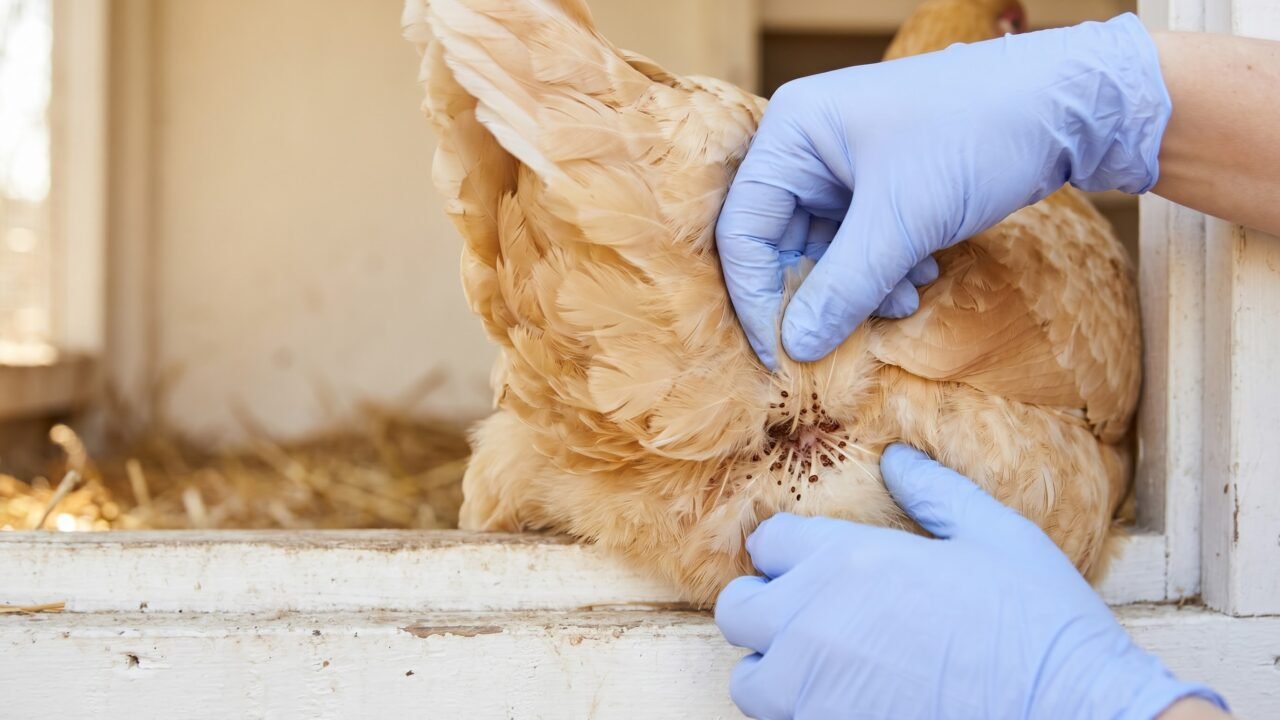
Scratch behind a hen's vent feathers and find dark, moving specks. That discovery is almost always chicken mites. They are the most common external parasite on backyard flocks in North America, and a heavy infestation can pull enough blood to visibly pale a comb, cut egg production by 10 percent or more, and in the worst cases kill young birds. The good news: you can clear them with consistent treatment over two to three weeks, and a few simple habits keep them from coming back.
Two species cause nearly all the trouble in backyard coops: the northern fowl mite, which lives on the bird around the clock, and the red mite (also called the roost mite), which hides in coop crevices by day and feeds at night. Knowing which one you have shapes everything: where you treat, when you treat, and how long you need to keep at it.
Northern fowl mite vs red mite: the key differences
Both mites are tiny enough to miss at a quick glance, but their habits are almost opposite, and that difference matters for treatment.
The northern fowl mite (Ornithonyssus sylviarum) spends its entire life on the bird. It feeds on blood, lays eggs in masses at the base of vent feathers, and completes its life cycle in as little as five to seven days, according to Mississippi State University Extension. Because it never leaves the host, you will find it on a bird you catch during daylight. Look for dark red-to-black specks in the vent area, along the breast, and at the base of the tail. Heavy infestations leave a characteristic dark, greasy discoloration and matting of feathers around the vent, one of the clearest visual cues in poultry keeping.
The red mite (Dermanyssus gallinae), also called the chicken mite or roost mite, does the opposite: it hides in cracks, roost joints, and nest-box seams during the day and crawls onto birds to feed after dark. If you catch a bird in daylight and find nothing, but your hens are restless at night, avoiding the roost, or showing pale combs, red mites are the prime suspect. They are gray to dark red after a blood meal, up to about 1 mm unfed and closer to 1.5 mm after a blood meal, and can survive in an empty coop for six to nine months without feeding, depending on temperature and humidity (Alabama Cooperative Extension System reports up to nine months; eXtension cites up to six months). That long survival is why a coop can re-infest a new flock weeks after you think the problem is gone.
A third species worth knowing: the scaly-leg mite (Knemidocoptes mutans). These microscopic mites tunnel under leg scales rather than feeding at the surface, causing thick, crusty, lifted scales and sometimes lameness. The treatment is distinct from other mite species: petroleum jelly applied generously to the legs suffocates the mites, per the Merck Veterinary Manual. Correct identification matters here because the treatment approach differs entirely from surface-feeding species.
Quick ID table: northern fowl mite vs red mite vs scaly-leg mite
| Feature | Northern fowl mite | Red / roost mite | Scaly-leg mite |
|---|---|---|---|
| Where it lives | On the bird, day and night | Coop crevices by day; on bird at night | Under leg scales |
| Where to look | Vent area, breast, tail base | Roost joints, nest-box seams (day); vent area (night) | Legs and feet only |
| Color | Dark red to black | Gray; red-brown after feeding | Pale gray (microscopic) |
| Life cycle | 5-7 days (whole cycle on bird) | As short as 1 week (optimal temps) | Slow; months on host |
| Survives off-host | Up to ~4 weeks | Six to nine months without feeding (range across sources) | Mostly stays on host |
| Primary sign | Dark matted feathers at vent; visible specks on bird | Pale comb; hens avoiding roost; blood spots on eggs | Raised, crusty, distorted leg scales |
| Treat the bird? | Yes - primary target | Yes - secondary | Yes - petroleum jelly |
| Treat the coop? | Yes - also treat | Yes - primary target | Yes - also treat |
Signs your flock has mites
Mite infestations often stay light and unnoticed for weeks. By the time you see obvious symptoms, numbers are usually in the hundreds per bird. Watch for these:
- Pale or bleached comb and wattles (anemia signal, take it seriously)
- Hens that fidget, preen excessively, or scratch their heads against the feeder
- Reduced appetite, rapid weight loss, lethargy
- Drop in egg production: a 10 percent or greater decline is documented in infested flocks
- Dark, matted, greasy-looking feathers around the vent (northern fowl mite signature)
- Hens refusing to enter the coop at night or sleeping on the ground (red mite classic)
- Blood spots on eggs or on the inside of nest boxes
- Moving red-brown specks on your forearms after handling birds or cleaning the coop
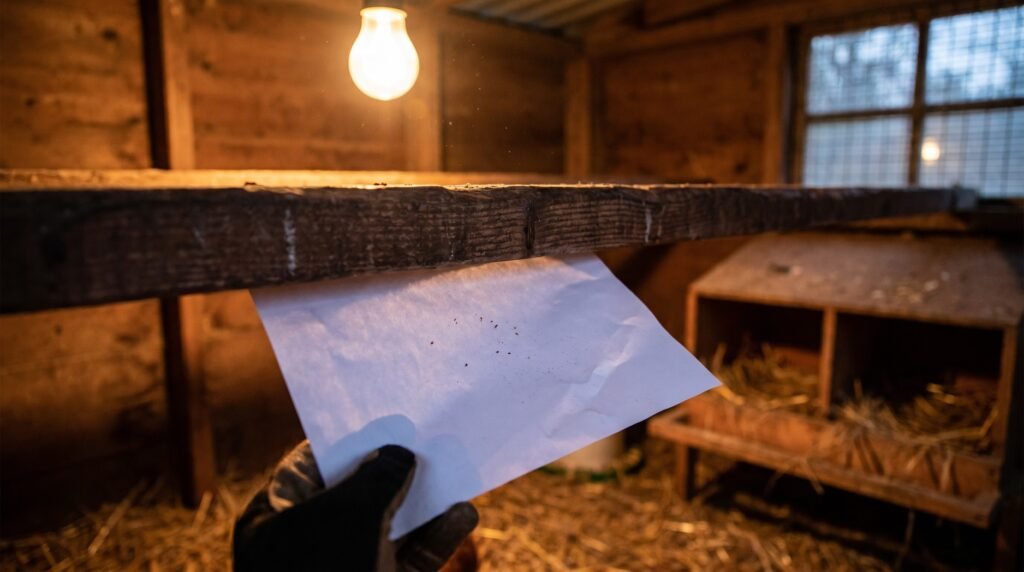
To check for red mites in the coop during the day, run a white piece of paper along the underside of a roost. If tiny specks transfer and smear red when pressed, red mites are present. A piece of blue painter's tape wrapped sticky-side-out around a roost overnight is another simple trap; check it in the morning.
For northern fowl mites, part the feathers in the vent area of a freshly caught bird and look at the skin. Even 50 mites per bird can be detected this way once you know what to look for. Mississippi State University Extension recommends monitoring birds on at least a weekly basis during active management.
The 3-step treatment plan
No single product kills mite eggs. That is the central fact that determines the whole treatment strategy: you must retreat to catch newly hatched mites before they reproduce. Skip the follow-up treatment and the infestation rebuilds from the eggs that survived your first pass.
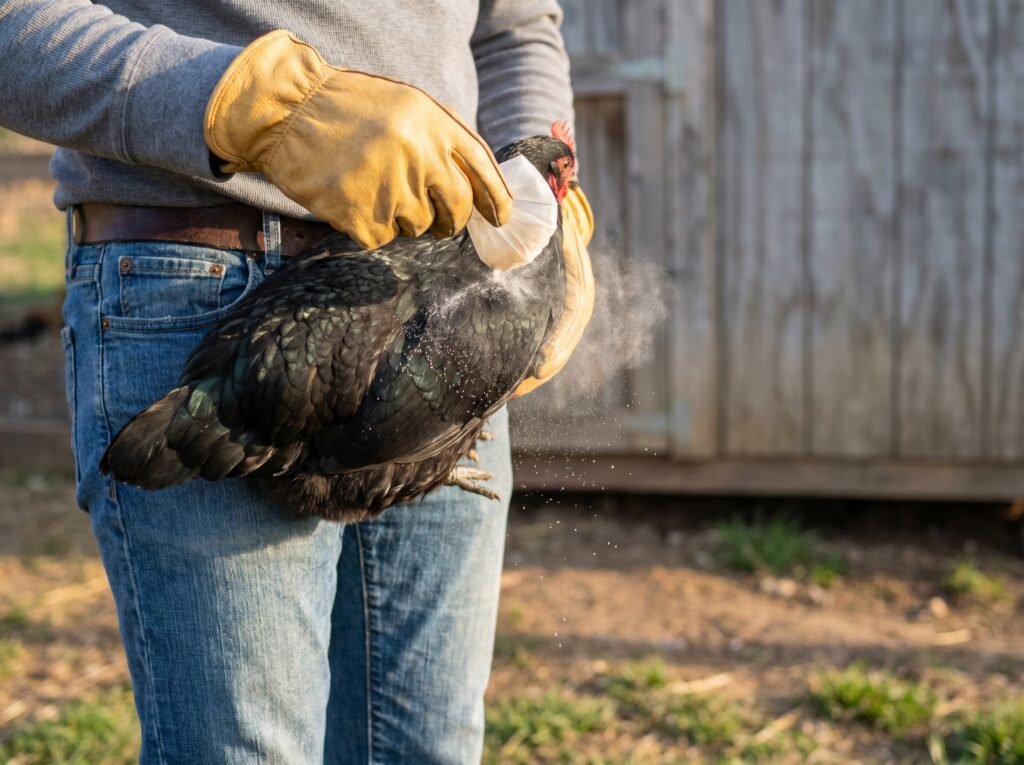
Step 1 - Treat the birds
Permethrin dust (0.25% formulations labeled for poultry, such as Prozap Insectrin Dust or garden and poultry dust products) is the most widely used and accessible option for backyard keepers. Apply it directly to the skin, working it in around the vent, under the wings, along the breast, and at the base of the tail. Target the skin, not just the surface of the feathers. There is no egg-withdrawal period for permethrin applied as directed on poultry-labeled products, so you can continue to collect eggs normally.
Permethrin is a synthetic version of pyrethrin, the natural insecticide from chrysanthemum flowers. It persists longer than natural pyrethrin and so needs to be applied a little less often. That said, resistance to pyrethrins and pyrethroids is widespread in northern fowl mite populations - worth knowing if treatment seems less effective than expected. Pyrethrin-based dusts (the natural version) are also effective and are the standard recommendation for certified organic flocks.
Sulfur dust is a lower-cost alternative that works, though it requires careful application and has a stronger odor. Whichever product you use, re-treat every seven days for at least three consecutive rounds to break the life cycle. With NFM's 5-7 day cycle, treating once and stopping almost guarantees reinfestation from surviving eggs.
Diatomaceous earth deserves an honest look here, because it generates more debate than almost any product in backyard poultry keeping. Food-grade DE works by abrading the waxy cuticle layer on the mite's body, causing dehydration. The mechanism is physical, not chemical. DE has no effect on mite eggs, however, which limits it as a standalone treatment for active infestations. It performs better as a preventive tool than a cure. If you choose to use it, add food-grade DE to a dust bath where hens self-apply it; efficacy drops significantly when humidity is high. Wear a dust mask when handling DE, because fine silica particles irritate lungs in both people and birds. The respiratory caution is real.
Ivermectin is sometimes mentioned in online discussions but is not FDA-approved for use in egg-laying poultry in the United States. If you are considering prescription-only options, work through a licensed poultry veterinarian.
Step 2 - Clean and treat the coop
For red mites especially, the coop is the primary battleground. Remove all bedding and litter first. Then treat every crack, roost joint, nest-box corner, and wall gap with a permethrin-based spray or dust. Pay particular attention to the underside of roost bars, the joints where roost bars meet the wall, and the seams of nest boxes, as those are where red mites concentrate by day.
On cleaning the chicken coop thoroughly before treating: vacuuming or brushing debris from cracks first lets the treatment actually contact mites, not a layer of organic material. After dusting or spraying, let the coop dry before returning birds. Replace all bedding with fresh material.
For northern fowl mites, coop treatment matters less than bird treatment, but do treat the coop anyway. NFM can survive off-host up to four weeks under favorable temperature and humidity conditions, so a treated environment is not safe to skip.
Scaly-leg mites, by contrast, can survive in coop litter and the poultry house environment, so always treat the coop alongside the birds even when it looks like a leg-only problem. Coat affected legs generously with petroleum jelly. This physically suffocates the mites burrowing under the scales. Repeat weekly for four to six weeks, as it takes time for damaged scales to shed and regrow. Severe cases - deep crust, lameness, or open wounds on the legs - warrant a visit to a poultry vet, a threshold the chicken health hub covers in detail.
Step 3 - Repeat and monitor
Retreat birds and coop at seven days after the first treatment, then again at 14 days. Most extension guidance recommends a minimum of three treatment rounds. After that, re-examine birds weekly for four weeks to confirm the population has collapsed. If you are still finding live mites on birds at day 21, consider whether you missed coverage areas (check under wings and around the vent carefully) or whether the product is losing efficacy against a resistant population. In that case, switch to a different active ingredient class.
Red mite re-treatment logic is worth spelling out: with a life cycle as short as one week and off-host survival measured in months, a single coop cleaning will not end an infestation. Treat the coop, retreat at seven days, and check traps (paper wipes or sticky tape on roosts) for two weeks after the last treatment to confirm numbers are falling.
Prevention: building a low-mite environment
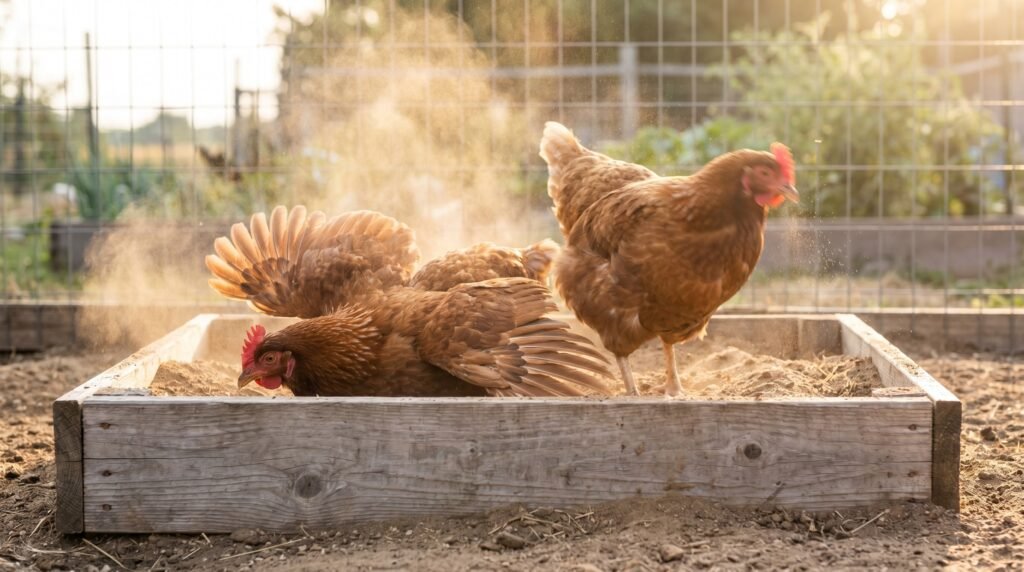
The combination of regular inspection and a maintained dust bath is the single most effective preventive tool available to backyard keepers without chemical inputs. Hens dust-bathe instinctively, and the fine particles smother and desiccate ectoparasites. A dry corner of the run filled with fine dirt or sand works well; adding food-grade DE to the dust-bath mix provides some additional acaricidal effect, though moisture reduces it quickly.
Other habits that meaningfully reduce mite pressure:
- Inspect every bird monthly: part vent feathers, check under wings. Do this more often (weekly) if wild bird traffic around the coop is high, since wild birds carry both NFM and red mites.
- Quarantine any new bird for at least 30 days before introducing it to the flock. Mites arrive on new birds more often than through any other route.
- Seal gaps and cracks in the coop interior. Fewer hiding places means red mites cannot build large reservoir populations. Light-colored paint on interior walls makes mites easier to spot.
- Control rodents. Mice and rats carry mites between farms and between coops. Maintain bait stations year-round, per Mississippi State University Extension recommendations.
- Reduce organic debris in coop corners, because deep piles of old litter give red mites ideal harborage. Regular litter management - including any role for diatomaceous earth in your routine - works best when you address the buildup itself first.
- After you handle a bird from an unknown source or attend a poultry swap, change clothes before entering your coop. Mites transfer on clothing.
One honest note on DE and prevention: it helps when conditions are dry, applied regularly, and used as one layer of a multi-part approach. It cannot substitute for physical inspection, quarantine, or prompt treatment when mites actually appear. Both extension resources and the Merck Veterinary Manual frame it as a useful supplement, not a standalone solution.
When mites become a veterinary situation
Most mite infestations in backyard flocks respond to the treatment protocol above without needing a vet. Escalate to a licensed poultry veterinarian if:
- A bird has a noticeably pale or white comb, sits fluffed and still, or stops eating. These are signs of significant anemia that may need supportive care.
- You have treated consistently for three rounds and still see heavy mite loads on birds. A vet can advise on prescription options or resistance testing.
- You suspect scaly-leg mite but leg damage is severe (deep crust, lameness, open wounds). A vet may need to assess for secondary infection.
- Any bird is injured, bleeding, or showing signs of systemic illness alongside the mite problem.
The chicken health section lays out the full picture of when husbandry-level care crosses into territory that needs professional diagnosis.